How to Upload Photos From Samsung S6 to Google Drive

Google Photos is a peachy backup solution for the photos on your telephone and lets you manage them on a calculator or other devices, including Apple devices. However, Google Photos does not offer a articulate mode to download all your photos to your device, Android or iPhone, in i go, directly. You can save every photo in Google Photos on your device directly, only one by i, and that is more incredulous on part of Google than information technology sounds. You demand to navigate your manner effectually apps to download or move your photos from Google Photos to your phone straight.
Google Photos works under an assumption that yous will click photos, take your phone upload them to Google's servers and that's information technology - that'southward the primary job. Even so, often nosotros too demand to download our photos, Google! We may need to download a bunch of one-time photos to share with someone else, we may want to download them to a wink drive and spotter them on the big screen instead of using a smart TV option to do that, at that place are lots of reasons why people search for 'how to motility photos from Google Photos to my telephone'. Then how practice you lot download Google Photos to phone or more than clearly, move photos from Google Photos to a new phone or a computer?
- Downloading from Google Photos to Android Phone Directly
- Transfer Photos from Google Photos to Phone Using A Figurer
Downloading from Google Photos to Android Phone Directly
Google makes downloading photos from Google Photos to phone a child's play. If y'all want to download photos from Google Photos to your telephone directly, you lot take the option of downloading each photo y'all have 1 by 1. Not interested? There is a workaround that transfers photos from Google Photos to your device'southward internal storage. This is nonetheless tedious plenty, but it works reliably and is free.
Part 1: Copying Photos from Google Photos to Google Bulldoze
Stride 1: Open Google Photos
Step 2: If you just desire to save some photos from Google Photos to your phone directly, you are in luck, you won't take to go through the hoops a lot. For this slice, it is assumed you desire to transfer all your photos from Google Photos to your device. Tap on Photos tab at the bottom. Long-press the outset photo in your library.
Step three: You lot will notation that the photo, as well every bit the engagement above information technology, has a checkmark at present. What you tin practise is that at present y'all can but keep scrolling downwards and tapping on the dates. Tapping on the dates selects all the photos under that date, saving you some time and heartache.
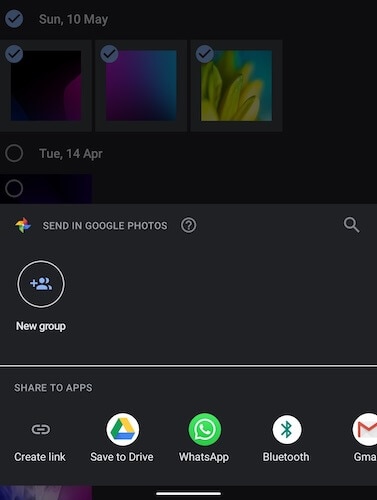
Stride 4: Afterward yous are done scrolling and borer dates till the cease, tap the Share icon at the top advertizement select Relieve to Drive
Step 5: You lot will be asked to select the size you want to save as, large or the actual. Select your preferred size
Pace 6: At present, you will see that some or all of the images are being downloaded, depending on which ones were already on your device and which need to be pulled from the cloud. After this is washed, you will run across a listing of image titles forth with your Google Business relationship email accost and the location the files volition be saved to on Google Bulldoze. You can change the location and tap Save to continue. It is advised that you select a split up unique folder to save your photos into, this will aid later to download photos from Google Drive to telephone.
Your selected photos volition now be uploaded to Google Drive.
So far yous have just transferred the bodily photos from Google Photos to Google Bulldoze. The photos are at present available both in Google Photos and in Google Drive but are yet in the cloud. Now, in the second function, you want to download the photos to your device storage.
Part ii: Downloading Photos From Google Bulldoze To Telephone'south Storage
In this role, you will download your photos from Google Drive onto your device's storage and so y'all know y'all have a local copy with you and are non tied up with Google'due south ecosystem in any way.
Footstep 1: Open up Google Drive Footstep ii: From the tabs at the bottom, select the Files tab that looks like a binder
Step 2: Navigate to the folder you saved your photos to from Google Photos
Stride three: Open up the folder and long-press any paradigm
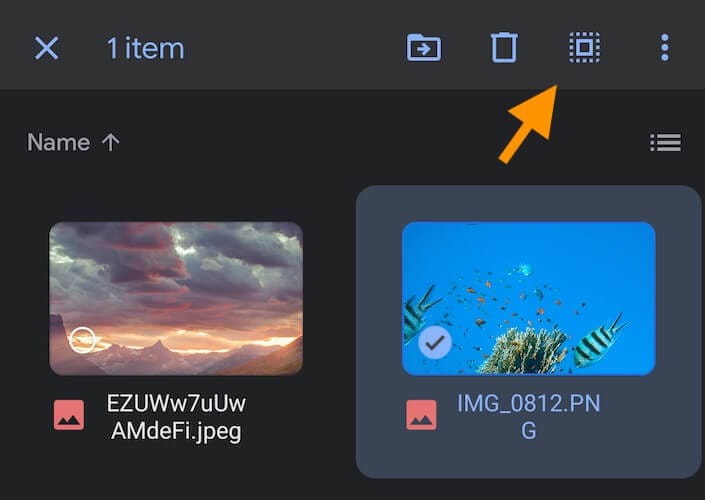
Step 4: Tap the icon at the top that looks like a square surrounded by dots. You will see that all your photos are now selected
Step five: Tap the 3-dot menu on the top-correct, and select Download from the list
Photos will exist downloaded to the default 'download' folder on your device's internal storage.
Office 3: Viewing Files on Your Device Using A File Explorer
Pace 1: If you lot do non take the Files by Google app on your telephone already, head over to the Play Store and download the app. This is a file explorer by Google that lets you browse and manage the files and folders on your Android device
Step 2: Open Files by Google app
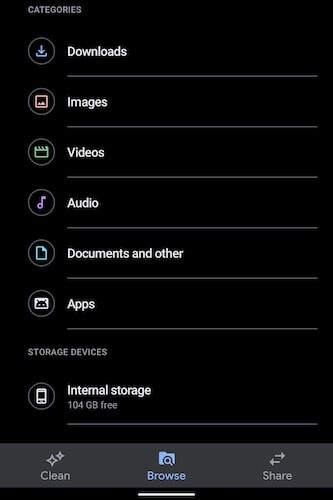
Step three: From the tabs at the lesser, select Browse.
Step iv: From the list of categories, select Images
Step 5: Here, images are shown as large thumbnails you can browse through
Step 6: To see (and make sure) where exactly are the files stored on your device, tap on any image, tap the 3-dot menu at the acme-correct and tap File Info.
Footstep 7: Head back to Scan using the tab at the bottom
Step 8: Scroll down and tap Internal Storage. This is where you tin see and browse through all files and folders on your Android in a desktop-like fashion
Pace 9: Scroll down to the Download binder. This is where the files you downloaded from Google Drive volition be.
Transfer Photos from Google Photos to Phone Using A Figurer
As you lot would have go aware, the direct way to transfer photos from Google Photos to phone can be painful if you have years' worth of photos. To transfer some photos or a couple of photos here and in that location, that method is a quick way to become nearly, but in case you lot are looking to accept copies of your photos with you locally, that method falls curt. It consumes internet data for downloading, then uploading, and and then downloading once more. For a big number of photos or if you lot want to transfer your photo library from Google Photos to your device, that is a lot of data consumption we are looking at. Fortunately, there is an easier way to go about information technology, and it involves only a old download of photos from the cloud, saving you a lot of data.
Role 1: Downloading Photos from Google Photos to Reckoner
Google provides a service it calls Google Takeout, which substantially allows yous to download a copy of all your data with Google onto your figurer. Yous tin select which information you want to download, so for this piece, nosotros will download simply the photos.
Step 1: Open your spider web browser and visit https://takeout.google.com
Footstep ii: Sign in if you are not already signed in to your Google account
Step three: You will come across the option to Create a New Export, and to select data to include
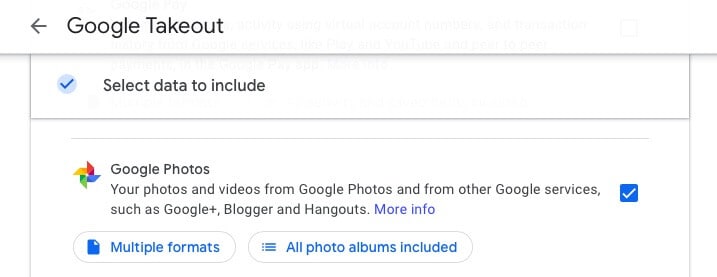
Step 4: Click Select All and and so click Deselect All to ensure nosotros select simply what we want to download - our photos and nothing else for at present
Stride 5: Scroll down and bank check Google Photos
Footstep six: Past default, all photo albums are included. If you do non want to download a specific anthology or two, yous can deselect from the listing.
Step 7: Curl down till the end and select Next Step
Step 8: In the next part, past default, the choice is to ship an email link. Leave it intact for now. Frequency is set to once by default, and that is what we desire today. The file type is ZIP by default. Change the size setting from 2 GB to 50 GB to minimize the number of files to download.
Step 9: Lastly, click Create Export. Depending on the size of the export, subsequently a while, you will encounter the export listed right here. A link to download would also be emailed to your Gmail address.
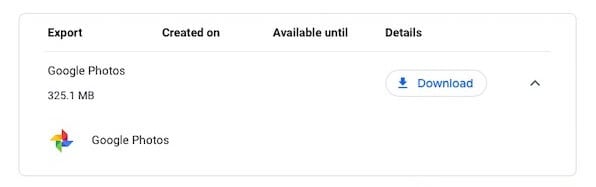
Step 10: Click download and the ZIP file volition exist downloaded to your estimator.
Part two: Movement Photos From Estimator To Phone Using Dr.Fone
At present it is time to transfer photos from computer to the phone. How do you do this? The best way to do this is with Dr.Fone - Phone Manager (Android). Information technology is a fast, easy way to manage information on your phone from your estimator and is easy to use.
![]()
PhysicianFone - Phone Manager (Android)
Transfer Data Betwixt Android and Mac Seamlessly.
- Transfer files between Android and computer, including contacts, photos, music, SMS, and more.
- Manage, export/import your music, photos, videos, contacts, SMS, Apps etc.
- Transfer iTunes to Android (vice versa).
- Manage your Android device on figurer.
- Fully compatible with Android 8.0.
half-dozen,053,096 people have downloaded it


Recollect the Zip file that was downloaded? Unzip it and it should requite yous a folder called Takeout. Within that folder is another folder called Google Photos that contains even more folders comprising all your photograph albums stored on Google Photos.
Step 1: Download and install Dr.Fone on your computer
Step two: Open PhysicianFone on your computer and select Phone Manager

Pace iii: Connect your phone to your calculator and enable USB debugging
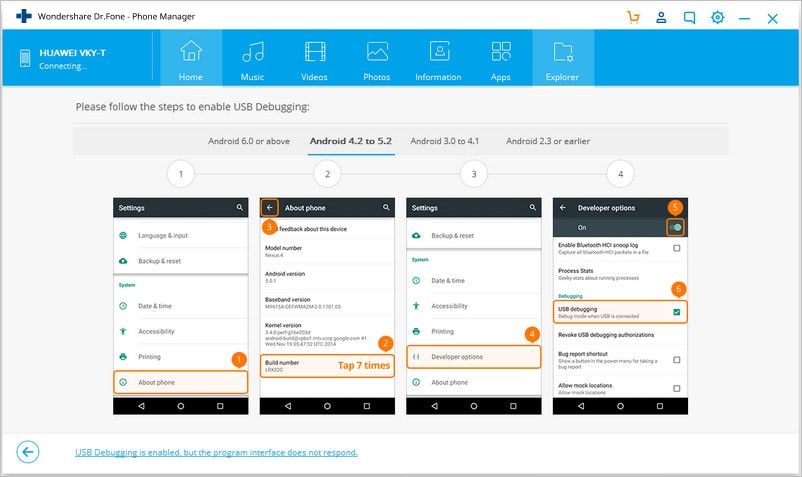
Step iii.1: With your phone connected to the computer, swipe downwardly from the height to bring the notification shade and select USB options
Step 3.2: Select File Transfer
Step 3.iii: Go into Settings on your phone and into About Phone
Step 3.iv: Curlicue down to the build number and tap it until Developer Options are enabled
Stride 3.5: Under Settings, curl downwardly to Arrangement and if Programmer Options are non visible there, select Advanced and caput into Programmer Options to enable USB debugging. Grant whatsoever permissions that the telephone might prompt you for.
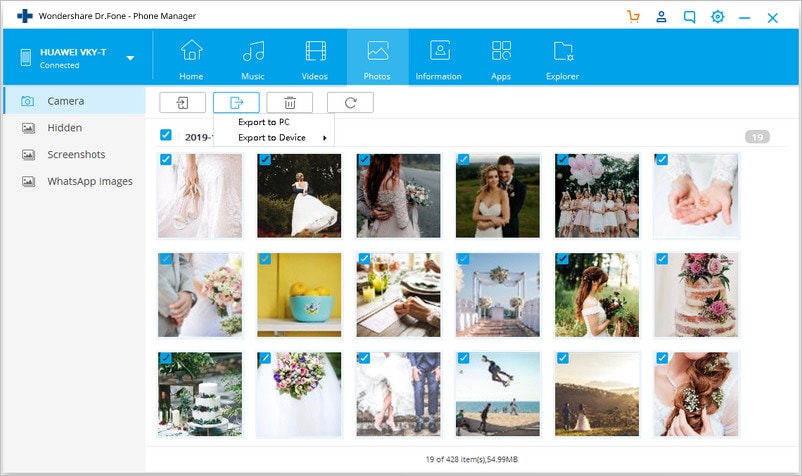
Pace iv: PhysicianFone volition recognize your phone and nowadays you with a nice, clean interface
Step 5: Select Photos from the tabs at the elevation
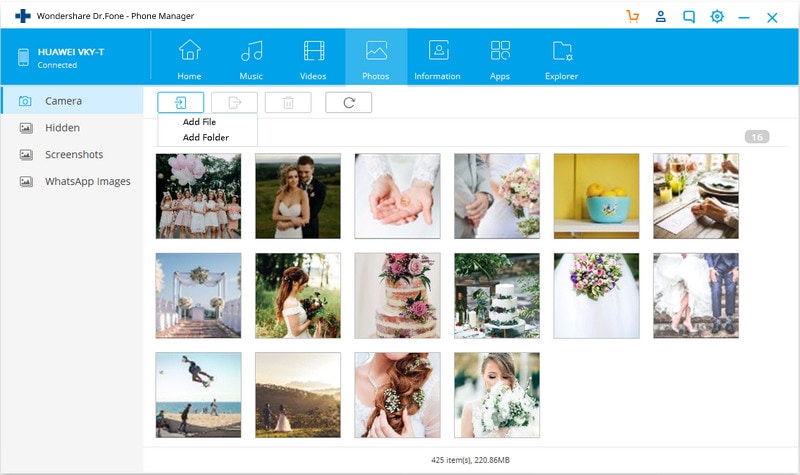
Step 6: Click the Add button and select Add together folder
Footstep 7: Navigate to the Takeout folder and select Google Photos and click Open up
Photos will now exist transferred to your phone.
Effort It Free Try It Free
Determination
Google does not get in like shooting fish in a barrel to download photos from Google Photos to your device or computer. Google would rather shop them and view them in their apps. You need to hop between a few apps to download photos from Google Photos to your phone directly. However, if you are on a estimator, they besides provide a way to download your data from Google, called Takeout. Using this characteristic you can create an export of your all your data or simply what you prefer, such as photos, and download to your computer and from in that location you can either store information technology elsewhere or transfer the photos to your telephone using Dr.Fone Phone Manager (Android) that is one of the best apps available to manage data on your phone using a figurer and a USB connection.
Other Popular Articles From Wondershare
Source: https://drfone.wondershare.com/transfer/how-to-transfer-photos-from-google-photos-to-phone.html
0 Response to "How to Upload Photos From Samsung S6 to Google Drive"
Post a Comment